Welcome Nutanix and updates for VMware and vSphere

Maestro is a solution that allows users to create, manage, control, and monitor virtual infrastructures across public and private clouds in terms of self-service, with the minimum interaction with the IT operations teams.
Maestro v.3.37 includes the integration with Nutanix, new functionalities for VMware and vSphere, and the ground changes in Maestro CLI among other important updates.
Integration with Nutanix

Managing Nutanix instances
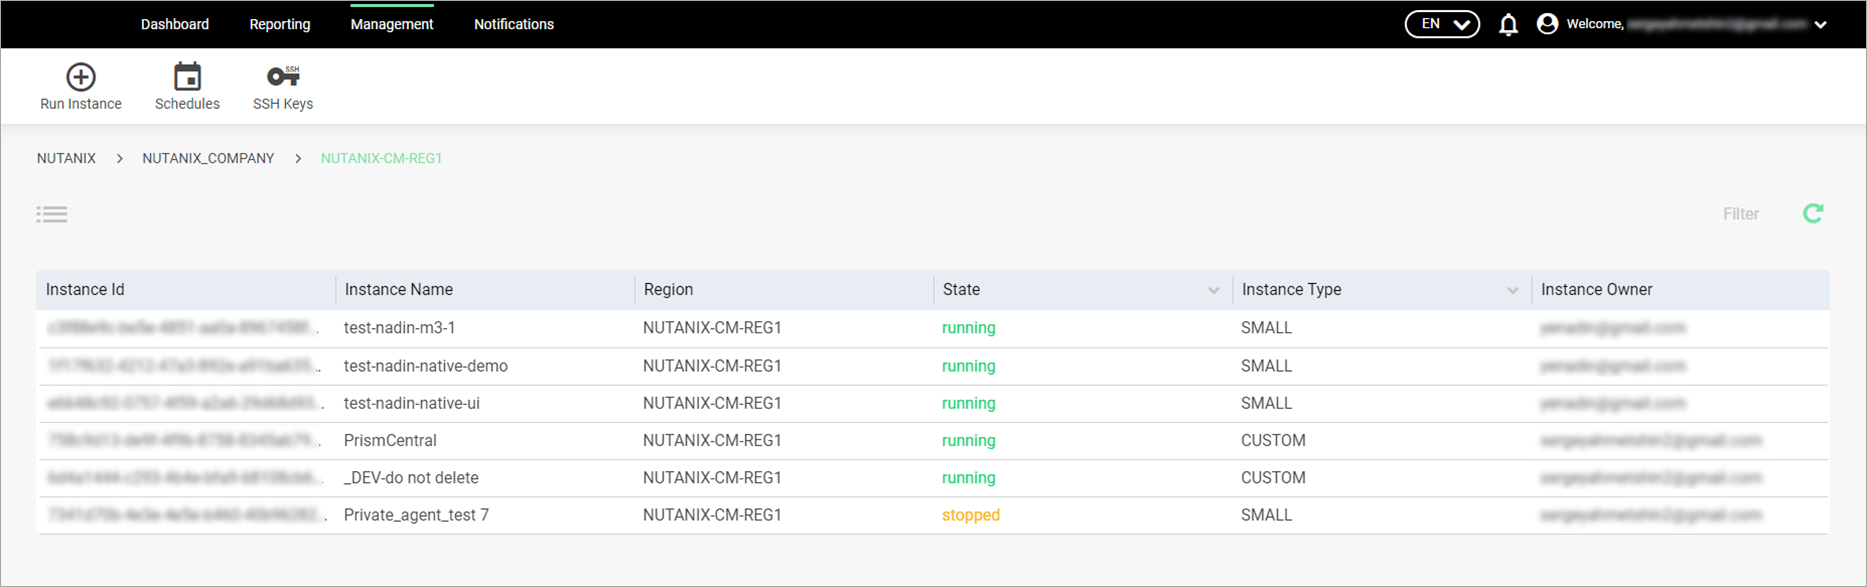
In terms of the initial integration, Maestro users can now run instances in the Nutanix cloud and review information on instances run via Maestro on the Management tab. To run instances in Nutanix, Maestro users should use the Run wizard.
On the Management tab, users can also perform other standard actions, such as stop, reboot, and terminate their instance from the Content View section. The section also provides basic information on the instance. However, no detailed instance report will be available for Nutanix instances, as of now.
However, to make the management process more effective, tags mechanism was also enabled. Users can add internal Maestro tags to their instances.
Billing and reporting in Nutanix
Based on Maestro audit events, users can retrieve the billing information related to their Nutanix instances. The billing information provided on the Reporting tab is calculated based on Maestro pricing policies.

Integration with VMware and vSphere
Maestro v.3.37 introduces a complex of new features implemented for VMware and vSphere – tagging, enhanced pricing policy, SSH keys, and init (user) scripts.
Tagging in VMware and vSphere
In Maestro, tags are a useful mechanism for grouping instances for different purposes.
Tags are used for:
- quotas and billing – to limit the costs for instances of a specific group,
- reporting – to see expenses of the groups of instances,
- scheduling – for setting one schedule for instances with similar utilization,
- platform services – tags are set for instances where platform services are running, etc.
In VMware, tags are associated with two entities – virtual instances and vApps.
vApp consists of one or more virtual instances that communicate over a network and use resources and services in a deployed environment. vApps allow disparate virtual instances to work together in a stack as an application, and support cloud computing architectures. Administrators can nest vApps within vApps, set up resource pools and deploy new vApps based on the existing ones. Original information about working with vApps is here.
Maestro v.3.37 supports STRING tags for virtual instances.
vSphere supports two types of tags:
- string labels that do not have the structure of key = value and are strictly not considered by Maestro as tags,
- custom attributes with the usual structure of key = value that are familiar to Maestro mechanisms.
Maestro v.3.37 supports only the 1st type of vSphere tags – string labels.
SSH keys in VMware and vSphere
With release 3.37, Maestro supports SSH keys for Linux instances run in VMware. Users can work with SSH keys the same way, as they do in all other supported clouds.
Besides, Maestro enabled showing the IP address information in the content view. This will allow logging into a VMware instance if it was created with an SSH key via console.
To prevent launching a VMware instance without an SSH key, the respective validation was added to check if the instance is run with an SSH key pair. This functionality was enabled for Linux instances.
Init (user) scripts in VMware and vSphere
When an instance is launched, Maestro adds the respective init script there. This script adds the necessary SSH keys to the instance.
If the instance is created with a Chef profile via the unified Terraform template, Maestro adds its own init (user) script. As a result, Chef starts autoconfiguring the instance and installing everything set in the template. This functionality was enabled for Linux instances launched in VMware.
To enable auto-configuration and init (user) scripts for VMware, you need
- A pool of IP addresses (created by the team configuring vCloudDirector) for the Maestro team to use it.
- VMware tools installed on the pre-configured images of vCloudDirector (by the team configuring vCloudDirector).
Updates in Maestro CLI
With this release, Maestro CLI was updated to the version 3.37.7. This update includes many new features including the scope of new commands for tenant and instance management, enhanced reporting, and user permissions.
Checking available tenants, regions, images, and shapes
In Maestro CLI, you can check the available tenants by the m3 describe-tenants (m3 dtn) command:
m3 dtn -c <CLOUD>
-c (--cloud) is the obligatory parameter that can take one of these values in the upper case – AWS, AZURE, CSA, ENTERPRISE, EXOSCALE, GOOGLE, HARDWARE, HPOO, OPEN_STACK, VMWARE, VSPHERE, and YANDEX.
The command returns the list of the tenants that are or were activated in the specified cloud:

Other m3 describe- commands return the available regions, images, and shapes:
- m3 describe-regions (m3 dr) returns the list of the regions activated on the tenant: m3 dr -tn <tenant_name>
- m3 describe-images (m3 dim) shows the list of the machine images available for your tenant in a specified region: m3 dim -tn <tenant_name> -r <REGION>
- m3 describe-shapes (m3 dsh) shows the list of shapes available for the specified tenant, cloud, and region: m3 dsh -c <CLOUD> -tn <tenant-name> -r <REGION>
Reporting via Maestro CLI
Maestro provides 5 report types:
- Total shows total costs for resource utilization for the specified period.
- Subtotal shows costs for resources for the specified period, split into categories.
- Resource shows detailed costs for each of the resources utilized for the period.
- Hourly shows hourly report.
- Multitenant shows costs for the customer.
These reports are available on the Reporting tab of Maestro UI and can be requested from Maestro CLI as well:
- m3 total-report (m3 treport) returns the total report on the tenant: m3 treport -tn <tenant_name> -rf <report_format> -fr <from_date> -to <to_date>
- m3 subtotal-report (m3 streport) returns the subtotal report on the tenant: m3 streport -tn <tenant_name> -rf <report_format> -fr <from_date> -to <to_date>
- m3 resource-report (m3 resreport) returns the resource report on the tenant: m3 resreport -tn <tenant_name> -rf <report_format> -fr <from_date> -to <to_date>
- m3 hourly-report (m3 hreport) returns the hourly report on the tenant: m3 report -tn <tenant_name> -e <email_address> -d <date>
- m3 multiproject-report (m3 mreport) returns the multitenant report on the customer: m3 mreport -c <cloud> -ct <cloud_target> -type <report_type> -fr <from_date> -to <to_date>
Reports can be obtained in two formats – sent to the specified email address and returned to Maestro CLI in the json format.
To request the report, you must have the corresponding user permissions in all the clouds or specify the cloud directly.
Here is the example of the total report returned in the json format to Maestro CLI:

Maestro CLI access and permissions
Maestro CLI supports the same differentiated system of role-based permissions which determine the functionality available for users in private regions and in public clouds:
- READ allows retrieving the relevant information about the tenant and its resource.
- VM allows managing tenant resources.
- META allows managing the tenant's meta data.
- NEW RESOURCES allows creating and activating new resources.
- KILL RESOURCES allows terminating instances, deleting resources, deactivating services, etc.
- ADVANCED MANAGEMENT gives advanced rights for managing resources (including not-owned ones).
- ADMIN MANAGEMENT gives access to Maestro tabs and wizards used for customer administration.
Maestro provides the same permissions for all command line tools – Maestro API, Maestro SDK, and Maestro CLI. However, these permissions can differ from the permissions you have on Maestro UI.
You can check your permissions via the My permissions wizard in the My preferences page by selecting Maestro SDK in the Environment field:

If you do not have permissions to perform a certain command, Maestro CLI will return you a message:

Besides these, Maestro CLI scope was greatly expanded with the new commands for working with instances and storages, using SSH keys, working with Terraform, and managing quota.
Other improvements
Besides the improvements described in our previous post and the improvements described above, Maestro v.3.37 includes these important updates:
- New administrative wizards – Resource quota and Manage API users – were added, and the Default settings wizard was reworked completely.
- Six new platform services are now supported by Maestro – Cloud Monitoring Service, Docker Service, Load Balancer Service, Messaging as a Service, Relational Database Service, Zabbix as a Service – and all the supported platform services can be launched from Maestro UI (Catalog tab).
- Terraform engine processes Terraform templates uploaded by Maestro users. The templates can contain modules from different providers to resolve different purposes.
- System and programmatic keys for Maestro can be created by customer administrators via the Manage API users wizard and used by an entity called API user.
- With this release, Maestro introduces an analytical tool that enables monitoring, diagnostics, recovery steps, and support team notification for issues for Maestro on-premise. The diagnostic tool is a shell script added to a cron schedule.
- Admin CLI was updated to the version 3.37.8 with the unified aliasing system, autocomplete, VMware support, and the functionality for configuring AWS Cost Explorer as well as a number of new and updated commands.
We keep enhancing Maestro to provide the best services to our users.
;)


Comments
Post a Comment